Have you been considering using tiered trays in your decor? If so, I have ideas to help you get started.
Start easy — use what you already have!
Do you have decorative balls, pinecones, or ornaments? Those will definitely work. Do you see that green gingham tree? It could not be more ugly! But it blends beautifully.
Get a little creative and wrap one of the deco balls with yarn or string. Drop your pinecone into a candle wreath. Voila!
2. Use color or not.
I used a light green and natural neutrals, including the burlap bow. Notice the touches of red that add depth without overpowering?
3. Make your own. Everyone loves handmade these days!
I made the tree, the beaded string, and the birdnest.
4. Include signs and phrases that you want to share with family and friends.
Hand-written “Do not open till Christmas” made of poster board and pretty paper.
5. Toss in some tiny little objects that you can pick up at the dollar stores.
Bells, a stack of tiny gifts, natural items, cute bows. Any items that you probably won’t put on your tree.
And here’s a freebie: things don’t have to match in size or scale, though it helps if you chose one or two colors and stick to them. Share pictures of your tiered tray with me at mary.marcotte@gmail.com. I’ll include them in another post.
I spent entirely too much time on Pinterest. I’ll just put that information out there. It’s probably not news to most people. Anyhoo. Lately I’ve been looking at Christmas crafts and posting them to my Christmas ideas section in the “diy craft make” board.
Photo credit: Pinterest.com
These recycled jewelry trees caught my eye. Between projects last week, I began gathering up old jewelry and other items that I could put onto a tree. Silly me, I thought I had enough items just sitting around. Maybe if I made a four inch tree!
I generally go big. So of course I my first attempt was out of reach. Worse, I sort of threw everything in. By everything I mean all of it. Wow, what a mess. So much. That taught me a lesson in restraint. Ha! I peeled it off so quickly that I forgot to take a photo. Trust me, it was a fail.
This photo and ones that follow are simply different sections of the same piece.
But I’m a determined chick, so once everything was back in its original condition–goodness, I’d put a lot of hot glue–I organized. Some things were just not going to work. Some colors were clashing with every other color. Some gawky items were too big! Talk about gawky. (Gawky is a Southern word for over the top tacky.)
So starting over, I reevaluated my options. In the end, I pared down the pieces to metals and pearls. Then I pared down the size of the tree. (Maybe I should have measured.) Of course, now I really didn’t have enough stuff, so I started digging through old buttons. I have many, as it turns out. In all states, colors and conditions. Add few beads and I began again.
I love this piece! From the beginning I thought I’d use my old silver sugar bowl as a stand. I cleaned it up, sort of. I left most of the tarnish on the legss and more ornate parts, which gives it a beautiful contrast of shiny against the dull parts. In the end paring down my choices really makes it work.
It’s a good thing that I can “eyeball a thing” because I didn’t consider measuring. Nevertheless, it’s a perfect fit–tight enough that I don’t have to glue the two pieces together, so cleaning will be much easier and I can change the base. How’s that for eyeballing a thing? (I like that phrase!)
I told you that the new studio is finished. Today I am, finally, all moved in. In fact, I loaded Sugaridoo on the longarm and have made a few stitches.
The longarm set up in part of the new studio, with Sugaridoo loaded and ready
My theory about quilting was “it’s like riding a bike” a Southern phrase meaning you can go without doing something for a long while and just pick it up again with few struggles. Well, that’s not entirely true. If you don’t peddle regularly, muscles become weak or at least change in some way. You may be able to move the bike, but chances are you’ll find yourself a little wobbly or without stamina. You may even fall. Sorry. That’s just how life and muscles work. They both require regular use of all of you.
The Bernina on my worktable in another room
Can you guess where I’m going with this? All the way back to the longarm. Wow, was I wobbly and without stamina! I improved fairly quickly, but the first couple of Sugaridoo rows are more like Sugaridon’t! I’m going to leave them. There’s a story in those wobbly (jerky) stitches, after all. Have you left sewing or quilting for a while and found that coming back was harder than you expected?
I can make a mess even on a small worktable. Here, I’m still putting things away. Organizing takes time!
Otherwise, I’m back to my usual self in the studio. I can’t wait to get in there, and now I can walk around petting fabric, looking at the wonders that my guys have built for me and thanking God for blessing me with both the guys and the studio.
I love little glass jars full of trinkets, buttons, and things gathered from family. The narrow shelves work beautifully.
Lastly, here’s another little blessing. My sister, Jeanne, was in the Air Force for several years and stationed in Turkey. Knowing my appreciation for textiles, she bought this small rug for me at one of the market places. Isn’t it fabulous? It was hanging on the wall since she gave it to us, but I decided to put it on the floor in front of the ironing station. It’s a perfect fit and adds beautiful color and design to the workroom. I love it, and now I see it daily and think of her every time. Thanks Jeanne!
Something soft and beautiful under my feet when there’s lots of pressing to do. Notice that it’s asymeterical from top to bottom–rather unusual.
As always, thanks for visiting my new studio. Please leave a comment. It’s lonely not hearing from friends.
Yes, of course, I had to use Google translate as I can’t read any of the languages in today’s post. Now all of this assumes Google knows what it’s doing. Either way, it has to be more accurate than my translation, which would be to name the pins. It’s been two weeks since the last post, so this is my attempt to win you back to PIW!
Hello to Fatemehzahedi who has a board titled گل با مقوا, which translates into flowers with cardboard, so let’s assume that by flowers she means these sweet little matchbox items. Imagine turning anything so small into these amazing works of art!
Ева Коляда has many boards, each with lots of pins, but I was especially drawn to this one: компаза, which is Russian for compass. Not all of the pins are two-color works. These are just the ones that spoke to me.
Sepideh_bly is our final pinner. Look at the sweetness in her board تزینی, Persian for decorative. You really have to see the items created in yarn on this board.
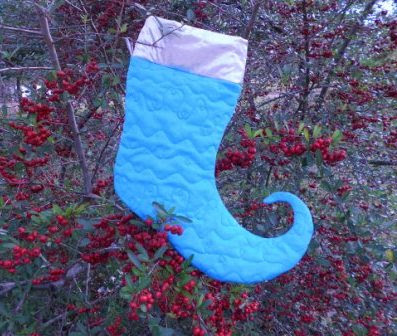
Elf Stockings are great fun to make and kids love them. You can make small (unquilted) ones to use as ornaments or large, quilted ones to hang on the mantel. Either way, you’ll enjoy this fun project. Directions here explain how to make a large stocking. Skip the quilting and reduce the size if you want to make smaller ones.
Getting Started: You’ll need a piece of fabric that is 20 x 34 inches; backing fabric 24 x 38; and batting 24 x 38. Narrow ribbon to match. Craft bell.
Make a quilt sandwich by layering the backing fabric, wrong side up; batting; and top piece, right side up. Quilt as desired. For the blue stocking I made loops across the entire top. For the red, I quilted large circular swirls. I like the idea of quilting in Christmas words or family names.
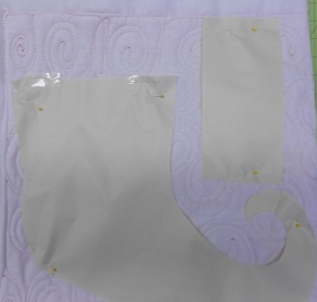
After the quilting is done, make a paper pattern I just sort of eye-balled it based on a regular stocking but added the curl above the toe section. I wanted my stocking to be big enough to hang on the mantel, so I made it just large enough to fit on the fabric I’d quilted. Keep in mind that you need a front and a back plus two pieces for the cuff. Alternatively, you can cut the stocking longer and eliminate the cuff.
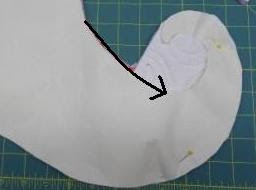
Tip: When you’re ready to cut the curve of the toe, cut around the outside first, then cut from the top of the curve to the vamp or ankle part in a straight line. After the entire stocking is cut out, you can go back and cut the inside of the curve. It’s much easier this way, trust me.
Let’s get sewing! Important Tip: to help turn the toe right side out after stitching, I cut a coordinating piece of ribbon about four inches long, folded it in half, and tucked it into the toe of the stocking. Leave the two ends sticking out so that the ribbon forms a loop inside the stocking and you can see the ribbon while you stitch. This ribbon will also hold your bell after the stocking is turned.
Begin stitching the stocking starting at the top on the foot front side. You will have to stitch slowly around the curve of the toe making sure to catch the ribbon pieces. Continue to stitch about two inches past the ribbon, backstitch and stop. The backstitching creates an extra seam around the part of the stocking where you will pull and tug to turn the stocking. I backstitch for about 10 stitches to make sure that the stitches in the point hold. Then continue stitching to the
Now make your second seam from the top of the stocking along the back, around the heal, and past the toe–again catch the ribbon. Continue past the ribbon about two inches, backstitch and stop. It may seem that you have lots of stitching around the toe area. You’ll need that to make sure nothing comes loose when you turn the stocking.
Turn the stocking right side out. It will take some creative pulling and pushing. Alternating between the two, pull on the ribbon loop that is inside the stocking and push the stocking from the inside–I use a slim dowel rod or the back of a knitting needle. Work slowly and methodically, it takes time and patience.
Once you’ve got the point and the stocking completely turned, you’re ready to add the cuff. First, stitch the cuff, right sides together, down the two shorter side seams to form a circle. Turn the cuff right side out and add binding to one edge as you would normally bind a quilt. I used a contrasting binding cut on straight of grain.
Now attach the cuff to the stocking. Both parts should be turned right side out. Insert the cuff into the stocking so that the right side of the cuff is against the wrong side of the stocking. Pin. Cut a piece of ribbon approximately five inches long. Form a ribbon loop for hanging and slip it between the cuff and stocking so that the loop is facing into the stocking and the ends of the ribbon will be caught in the seam. Pin in place. Stitch all the way around the raw edges. Turn the cuff to the outside and fold down.
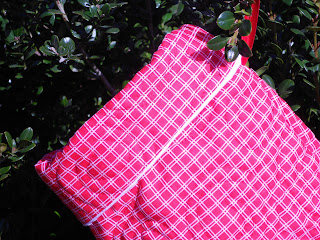
In red gingham check with white cuff trim.
Your stocking is ready for the little elves in your family! If you want to monogram the stocking, do that before you begin sewing. It’s much easier to work on a flat, quilted surface than inside a tight stocking.