Elf Stockings are great fun to make and kids love them. You can make small (unquilted) ones to use as ornaments or large, quilted ones to hang on the mantel. Either way, you’ll enjoy this fun project. Directions here explain how to make a large stocking. Skip the quilting and reduce the size if you want to make smaller ones.
Getting Started: You’ll need a piece of fabric that is 20 x 34 inches; backing fabric 24 x 38; and batting 24 x 38. Narrow ribbon to match. Craft bell.
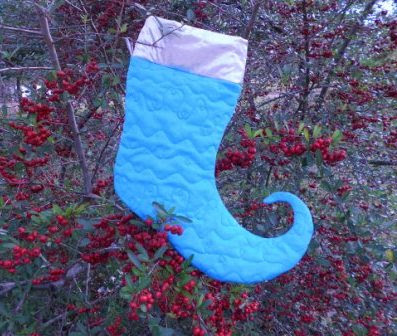
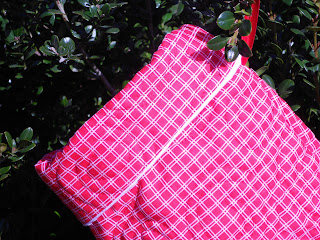
Make a quilt sandwich by layering the backing fabric, wrong side up; batting; and top piece, right side up. Quilt as desired. For the blue stocking I made loops across the entire top. For the red, I quilted large circular swirls. I like the idea of quilting in Christmas words or family names.
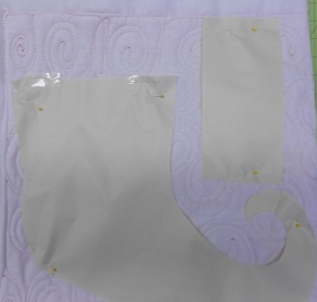
After the quilting is done, make a paper pattern I just sort of eye-balled it based on a regular stocking but added the curl above the toe section. I wanted my stocking to be big enough to hang on the mantel, so I made it just large enough to fit on the fabric I’d quilted. Keep in mind that you need a front and a back plus two pieces for the cuff. Alternatively, you can cut the stocking longer and eliminate the cuff.

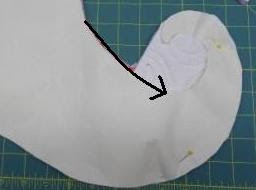
Tip: When you’re ready to cut the curve of the toe, cut around the outside first, then cut from the top of the curve to the vamp or ankle part in a straight line. After the entire stocking is cut out, you can go back and cut the inside of the curve. It’s much easier this way, trust me.
Let’s get sewing! Important Tip: to help turn the toe right side out after stitching, I cut a coordinating piece of ribbon about four inches long, folded it in half, and tucked it into the toe of the stocking. Leave the two ends sticking out so that the ribbon forms a loop inside the stocking and you can see the ribbon while you stitch. This ribbon will also hold your bell after the stocking is turned.
Begin stitching the stocking starting at the top on the foot front side. You will have to stitch slowly around the curve of the toe making sure to catch the ribbon pieces. Continue to stitch about two inches past the ribbon, backstitch and stop. The backstitching creates an extra seam around the part of the stocking where you will pull and tug to turn the stocking. I backstitch for about 10 stitches to make sure that the stitches in the point hold. Then continue stitching to the
Now make your second seam from the top of the stocking along the back, around the heal, and past the toe–again catch the ribbon. Continue past the ribbon about two inches, backstitch and stop. It may seem that you have lots of stitching around the toe area. You’ll need that to make sure nothing comes loose when you turn the stocking.
Turn the stocking right side out. It will take some creative pulling and pushing. Alternating between the two, pull on the ribbon loop that is inside the stocking and push the stocking from the inside–I use a slim dowel rod or the back of a knitting needle. Work slowly and methodically, it takes time and patience.
Once you’ve got the point and the stocking completely turned, you’re ready to add the cuff. First, stitch the cuff, right sides together, down the two shorter side seams to form a circle. Turn the cuff right side out and add binding to one edge as you would normally bind a quilt. I used a contrasting binding cut on straight of grain.
Now attach the cuff to the stocking. Both parts should be turned right side out. Insert the cuff into the stocking so that the right side of the cuff is against the wrong side of the stocking. Pin. Cut a piece of ribbon approximately five inches long. Form a ribbon loop for hanging and slip it between the cuff and stocking so that the loop is facing into the stocking and the ends of the ribbon will be caught in the seam. Pin in place. Stitch all the way around the raw edges. Turn the cuff to the outside and fold down.

Your stocking is ready for the little elves in your family! If you want to monogram the stocking, do that before you begin sewing. It’s much easier to work on a flat, quilted surface than inside a tight stocking.