Hi, or as we say in Cajun French, “comme sa va?” How is your improv going? Are you ready for plusses and Xs? They are here! These are two of my favorite blocks. I know, I know. TWO blocks? Well, you can choose one or you can make both. They are so similiar that I decided to put them together. Or you can wait and make your Xs in November or December to stretch the quilt out to the end of the year.
I hope you have been enjoying yourself and not stressing or letting this project annoy you. I’d love, LOVE to hear from you! If you are just joining us, you’ll find links to every month at the end of this post and on the Improv BOM 2024 tab above. Although I’ve had some setbacks and difficult times, I’ve been able to begin putting my quilts together.

The pink and green quilt is the row quilt. I simply put the blocks together in rows, separating them with a 3″ sashing. I’ve been making blocks without regard to their size. The first couple of months I did what I always seem to do: shoot for overkill! And make big pieces of 12-16 inches. That’s because I’m always afraid that I won’t have enough blocks. And let’s face it: it’s easy to forget yourself when sewing scraps together. You might call it a trance. Here we go:
- Decisions to make: How many blocks you need for your row will depend on the size of your blocks. A “throw it all in” quilt can be any size. I tend to make lots of blocks and find a way to throw them ALL in. I’ve now begun making much smaller blocks so my quilt doesn’t get too big!
- First, choose your colors. Have you been adding new fabric scraps each month? Something to keep in mind is that the width of the insert strips widely changes the size of the block.
- If you want your blocks to all be the same size but look more improv-ish, trim them down after making the set. Just think about what will happen before you decide on a variety of widths.
- Rotary cutting from yardage/fat quarters: You can quickly rotary cut strips for your blocks, especially if you’re shooting for the same size pieces. I used pre-cuts for the block but added scrap inserts in whatever size I found… and had lots of trimming to do.
- Cutting from pre-cuts: Pre-cut strips are perfect for the inserts, and you can the 5 1/2″ precuts for the block background.
- Chain piecing: You’ll learn how to sew on the diagonal, so make one or two blocks to get the feel of it. Then you can chain piece the rest of the blocks. Caution: the diagonal edges in the Xs stretch and lose their shapes, so don’t pull on the fabric. The last step requires matching lines together. Take your time. I’ll walk you through it.
- Pressing: Press as you go. It’s okay if you don’t follow my directions here, but I think I have a easy way.
- Recutting: Depending on your choices above, there may be some recutting to square up the final piece.
- Finishing: Though it feels difficult at first, this block consists of straight lines, just on the diagonal. I found I had lots of trimming, so I also had to cleanup my workspace. What a mess!

Directions for the Plus (+) Block
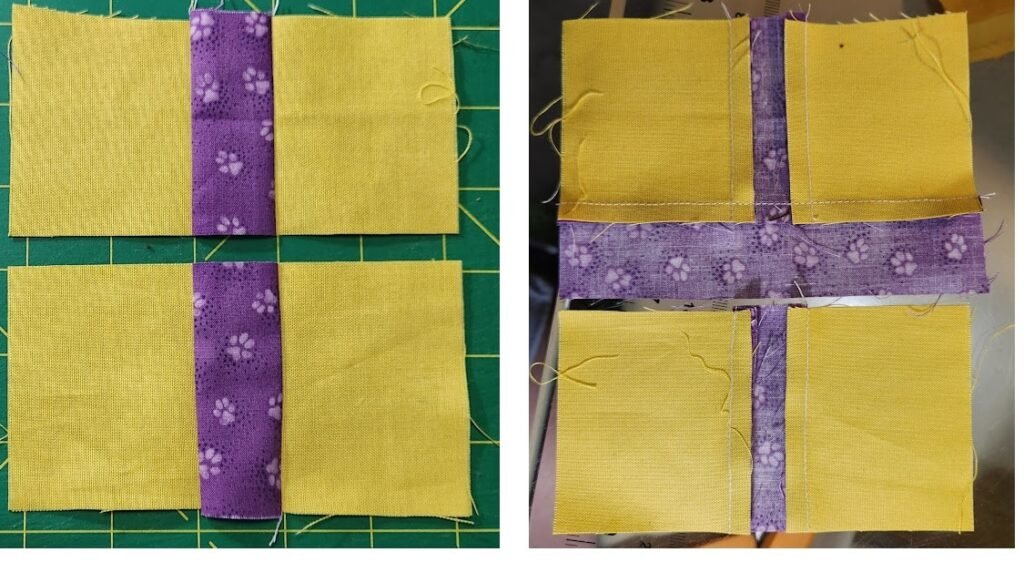
Here we go! There are only three pieces for each block. In the drawing the green (1) is one whole piece when you begin. You slice it somewhere in the middle and sew in the second piece (2). After pressing toward the middle, you slice it again on the perpendicular (3) and sew in the third piece. See? Sew easy!


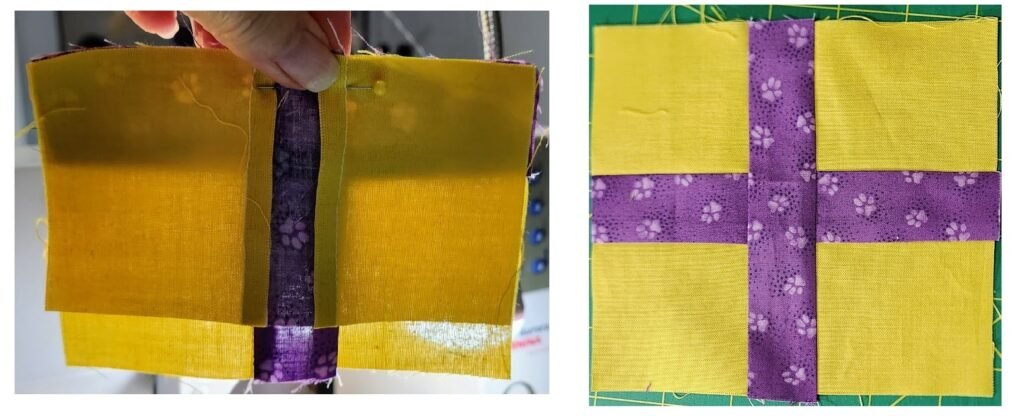
Okay, so this last seam is the one I fiddle with. I want my block’s arms to match, to be even on each side where they connect to the other arm. It’s a me-thing, so don’t feel pressured to do the same. If you don’t care about this, put the pieces together and sew. And you’re done.

But in case it does matter to you, here’s what I do: I look “through” my fabric by holding it in front of a light source. I can see that the edges of the purple are even from top to bottom and pin it so that nothing moves. Then I sew the final stitch. If all is good, I press the seam in. And now we’re done, too.
Directions for the X Block
You are basically following the same directions, EXCEPT you’re slicing on the diagonal. It’s not terribly difficult but I have a few tricks for you.
- Press both pieces before sewing, even if you pressed already.
- Place the diagonal-cut fabric down so the feed dogs will pull it through evenly. Also, hold both pieces together so that you’re moving them at the same speed. The piece that is cut straight-of-grain will “protect” the one cut on the diagonal.
- To match the last piece in the series, fold your 1/4″ seam allowance along the part you need to match, lay the pieces facing up and slide the last piece to find the match. Pin it down without moving it, then open the pieces so right sides are facing. To sew, leave the pin in place and sew your 1/4″ seam as far as possible before removing the pin. You should be able to get quite close to the pin to keep the fabrics from moving. Remove the pin and sew the rest of the seam.
- Press the seam allowance for pieces one and two away from the insert. Press the seam allowance for pieces one and three into the insert. This will help avoid bulkiness and the block will lay flat.

My method for making the arms of the X match is to begin by folding the single arm so that the 1/4″ seam allowance is folded to the wrong side. (See the left-most photo above.) Press well, so that it stays folded, or pin it.
In the middle photo, I am matching up the arm right where the axis meets. The arrow shows that I manuever the smaller piece until it matches, then carefully flip it over so that right sides are together and pin.
In the photo on the right, the arrow shows where I’ll begin my stitch–from the edge to the center as closely as possible before moving the pin. Then I’ll straighten the rest of the seam allowance, if necessary, and finish the seam. If you look at the bottom of the last picture, you can see that the brown arms don’t line up. This is because you’re working with a diagonal. (In the example of the yellow block above, the arms are in line with each other, but it’s also a straight line. Hence the difference.)

One last note, you can cut your diagonal lines in various ways. 1. top edge to bottom edge, 2. top edge to side edge, 3. side edge to side edge, 4. the angle of the diagonal line in any of these scenarios, 5. understanding that the two diagonals will be different unless you measure everything, 6. the two do not need to match in any way (it’s improv), and 7. the width and color of the arms can throw things off!

Click on any button below for information on previous blocks:


